Writing a Review Screen
Overview
In Docassemble, a review screen is the way that a user can make changes to their answers. A review screen displays one or more of the user's existing answers along with buttons that let the user edit each choice.
This page is a step-by-step tutorial on how to write a review screen, and covers:
Why make a review screen?
Review screens let your user change their mind about their previous answers. Like the list of fields in a question screen, one review screen can let the user review many answers. This list of answers goes under the heading review instead of fields. Each answer you want to let your user change includes:
- A button, with a label of your choice (we usually use "Edit")
- Fields that you want the user to revisit when they click the edit button
- Some preview of the user's current answer. It's common to repeat or paraphrase the question from the interview and show the answer next to the question.
You can do more advanced things with review screens, too:
- If you want the user to jump to another screen, perhaps they could edit multiple fields asked over several different screens in the interview, you can make the field name point to another question screen, labeled with an
event. This is usually used to edit lists of people with arevisitblock. - You can trigger follow-up code to run after the user makes a change. For example: you can trigger a code block to re-run, delete the value of another answer, or trigger another follow-up screen.
Writing a review screen is important. Without one, the only way a user can change their answers is with the "back" button, but the "back" button will undo the user's progress in the interview so far. Review screens are necessary for interviews to be fully WCAG compliant; for legal applications, WCAG 2.1 success criterion 3.3.4 requires that
a mechanism is available for reviewing, confirming, and correcting information before finalizing the submission
For docassemble applications, this means a review screen that allows the user to correct the information they entered needs to be present at the end of your interview.
Creating your review screen
Step 0: Complete the main port of your interview!
Large changes to an interview's logic will require large changes to the review screen as well. Before starting to make the review screen, it's best to have completed your interview.
Step 1: AL Review Generator
Download the primary YAML files of your interview. You can download the YAML file either:
-
from the docassemble playground, clicking on the "Download" button below the YAML editor, or
-
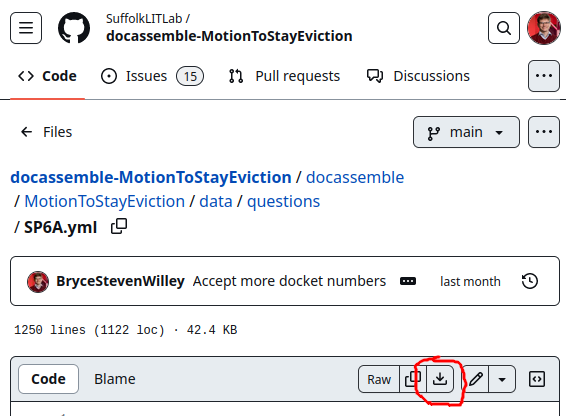
from GitHub. For example, for the Motion to Stay Eviction, you can navigate to the primary YAML file, SP6A.yml, and click the "download raw file" button.
You should download all of the YAML files that define variables used in your interview. The more YAML files you download, the more content you might have to cut from the generated review screen.
Once you have the YAML files, go to the ALDashboard's review screen generator, and upload your YAML files. You should leave the two checkboxes ("create revisit screens", and "point section blocks to review screen") checked, and press "continue". The next screen will have your review blocks! Make a file called review.yml in your playground, and copy the content from the review screen generator into it. Then, add a block in your main interview near the end like this:
include:
  - review.yml
Step 2: Understanding and Editing the Generated Review Screen
|-The generated YAML uses lots of |-. In short, something like this:
event: |-
  review_intro

code: |-
  review_form
is the same as this:
event: review_intro
code: |
  review_form
I'd recommend changing the YAML to how you normally write it to be more concise 1. The remainder of the examples will use the more concise YAML notation.
There are a few sections of the generated review screen YAML:
-
There are the events. These blocks look like this:
event: review_intro
code: |
  review_form
---
event: review_prior_case
code: |
  review_form
These blocks take each section from your interview and make it so that if a user clicks on the section, they are brought to the review page. In our experience, this works best, as all of the information that the interview asks can be edited in one place, and the user doesn't have to remember which section a piece of information belonged to.
-
The main review block. The block looks like this:
id: review screen
event: review_form
question: |
  Review your answers
review:
  - Edit: users.revisit
    button: |
      **Users**

      % for item in users:
      - ${ item }
      % endfor
  - Edit: has_existing_case
    button: |
      **Do you have an existing Michigan family court case?**

      Do you have an existing Michigan family court case?: ${ word(yesno(has_existing_case)) }
This block looks like a normal question block, except there is a
reviewattribute instead offields. Each list item under thereviewattribute is generated from question screens in the interview, and shows the text content and the fields from that question screen.Each element in the review can have the following dictionary attributes:
Editadds an "Edit" button in this section of the review screen. When clicked, the "Edit" button will take the user to fields on the right side of the:they have already answered. These fields can be:-
A single field, e.g.
Edit: has_existing_case -
A list of fields. Each of the fields will be re-shown to the user. e.g.
- Edit:
  - who_pays
  - which_side_pays
You can also use
recomputeas an item in the list that contains a sub-list of fields to re-calculate usingcodeblocks, without asking questions to the user again. You won't seerecomputein your generated interview, but you should add it if necessary. Here's an example:- Edit:
- county_choice
- recompute:
- trial_court
-
buttonacts like thesubquestionof this section of the review screen. It is where you should display the current value of the field or fields you want to let the user edit. You can use multiple lines and Mako tags in this area.
-
The revisit screens. These blocks look like this:
id: revisit users
continue button field: users.revisit
question: |
  Edit your answers about Users
subquestion: |
  ${ users.table }

  ${ users.add_action() }
Revisit screens are used to let people edit items in
DALists. For each of the other variables in thereviewblock, clicking their "Edit" button brings users directly to the question to let them edit their answers. That approach works well for simple variables like text, dates that the user enters, or yes no questions.But your interview might include objects and lists of objects, like a list of plaintiffs and another list of defendants. Instead of re-asking every question that someone answered to fill the list, docassemble brings to the user to a
revisitscreen that shows each item in the list to the user, and lets them choose which to edit individually.If you used the Weaver to make your interview, your interview might have a few different lists for people, like
users,other_parties,children,debt_collectors, andguardians. -
The
revisitscreens each show thetableattribute of theDAList. If needed, blocks defining the table for the lists will appear at the end of the generated review file.table: children.table
rows: children
columns:
- Birthdate: |
row_item.birthdate if hasattr(row_item, 'birthdate') else ''
edit:
- birthdate
Edits to the Review Screen
You'll want to change some aspects of the generated review screen. Note that if any errors happen in a specific edit element on the review screen, that element won't appear. It also won't appear if the attribute or variable to be edited doesn't exist. You should make sure that it does.
Some common issues to the generated review screen that I personally have run into before:
-
Remove generated
revisitandtableblocks for attachments and other non-people objects, if any, as well as their entries in thereviewblock.revisitis only needed for things the user enters themselves. Since the review screen generator can't determine which object types people have to enter information for, it generates them for all objects. -
Remove questions you don't want the user to edit. Sometimes, you will have questions that do set a variable in the interview, but the variable isn't used in the interview logic after that. For example, a question that's only use is to kickout a user if their problem isn't covered by the form. Here's an example of one:
---
question: |
  Are you Filing in a Probate Case?
fields:
  - Is your case a probate case?: probate_case
    datatype: yesnoradio
---
event: probate_case_exit
question: |
  You cannot continue to use the tool.
subquestion: |
  Based on your answer, you can't use this tool. Probate cases have different procedural rules than other cases. You may want to speak to a lawyer.

  If you made a mistake, click the **Undo** button. Otherwise, click the **Exit** button to return to Michigan Legal Help.
buttons:
  - Exit: exit
    url: https://michiganlegalhelp.org
If editing the value of a variable like this would only lead the person to a kickout screen and not change any other logic of the interview, then the generated review section should be removed.
Step 4: Things to add to the review screen
-
You'll find that certain variables often depend on each other, either explicitly or implicitly. For example, if you have a variable called
hearing_date_and_timethat you set tohearing_date + " " + hearing_time, you should recompute that field whenever the user edits the hearing date or time. You can do something like this to update the variable whenever you edit the hearing date:- label: Edit
fields:
- hearing_date
- recompute:
- hearing_date_and_time
button: |
...Another example of when two variables are implicitly dependent would be if you asked the user if the plaintiff or defendant is paying child support. If the user changes what side of the case they are on, their answer to what side is paying might change too! You can use a review entry that looks like this to edit both.
  - label: Edit
    fields:
      - user_ask_role
- who_paid -
As mentioned in step 2, if a variable doesn't exist or any errors occur when showing a section of the review screen, that whole section won't be shown. If some of the fields on a screen or optional, then their absence can cause their section of the review screen to not appear. Use
showifdefon optional fields, or fields that useshow if, to prevent this issue. -
While writing the review screen, you will likely have to redo your interview logic, so that it doesn't make assumptions about the presence or absence of variables, just their values, which I'd encourage. From the docassemble documentation:
For example, if you ask “Do you want to include your cell phone number?” and then you ask “What is your cell phone number,” the user’s cell phone number will be defined. If the user then changes the answer to the “Do you want to include your cell phone number?” question, then you will have a situation where the user’s cell phone number is defined but it should not be used.
See the last paragraph of this section of the docassemble documentation for more info.
Footnotes
-
Changing the whitespace and types of strings that are used by the review screen generator isn't possible at the moment. ↩